
Each day you build software there is another opportunity for security vulnerabilities to creep into production. So it is becoming more important than ever to shift security left and put security tests and the vulnerabilities they detect at the forefront of your software development lifecycle.
While GitLab offers a wide range of different security scanners, our AI-powered DevSecOps platform provides full visibility into the security of your software. We seek to allow you to not only run scans, but also to view results, bake in approval processes via merge request policies, and display current vulnerabilities in your default branch for future triage in our Vulnerability Report.
How do security scans run?
GitLab Ultimate displays your vulnerabilities directly in the merge request widget and it updates on every commit. These scans typically run via jobs in a pipeline, whether in the project’s .gitlab-ci.yml pipeline or in a separately-controlled compliance pipeline, security policy, or included pipeline configuration from a separate .yml file. You can run GitLab’s native security scanners or you can run an external scanner. For this blog post, I took running Snyk scans for a spin to see how I could feed the dependency scan results as vulnerability records back into GitLab. Additionally, I utilized the Static Analysis Results Interchange Format (SARIF) converter to read SAST results directly from Snyk without custom scripting.
Using external scanners
GitLab is highly extensible, and the platform allows for you to integrate myriad tools. You can use one of our built-in security scanners, or use an external scanner via a job in a pipeline or policy. GitLab serves as a single platform for governance and enforcement, allowing you to bring your own scanners and see the results early in the DevSecOps lifecycle.
All you have to do to get started is run a security job, and from there you can obtain the results in the merge request and the vulnerability report.
Run an external scan from GitLab CI
In this example pipeline, I run a Snyk scan externally in the test stage in a job I overrode called gemnasium-maven-dependency_scanning. First, I install the required packages (npm, Maven, Python3, and Snyk) and then I authorize with my SNYK_TOKEN variable saved in the variables section of my project. Finally, I run a snyk test command with the Snyk CLI and output the results to the JSON. This saves my results to the snyk_data_file.json, which I will parse in a script detailed in the next section and save to the required artifact file gl-dependency-scanning-report.json.
stages:
  - test

variables:

include:
  - template: Jobs/Dependency-Scanning.gitlab-ci.yml

gemnasium-maven-dependency_scanning:
  image: node:latest
  stage: test
  services:
  - openjdk:11-jre-slim-buster
  before_script:
    - apt-get update
    - apt-get install default-jdk -y
  script:
    # Install npm, snyk, and maven
    - npm install -g npm@latest
    - npm install -g snyk
    - npm install maven
    - npm install python3
    # Run snyk auth, snyk monitor, snyk test to break build and out report
    - snyk auth $SNYK_TOKEN
    - chmod +x mvnw
    - snyk test --all-projects --json-file-output=snyk_data_file.json || true
    - python3 convert-snyk-to-gitlab.py

  # Save report to artifacts
  artifacts:
    when: always
    paths:
      - gl-dependency-scanning-report.json
Parse the JSON
You can see scan results in the merge request widget from any external scanner as long as the artifact of the successful security job is named appropriately, for example, gl-dependency-scanning-report.json.
Here is an example script that converts the Snyk JSON output to the GitLab JSON output. In this example, I open the Snyk data file and load the vulnerability data. I create a new list of dependency files and a new list of vulnerabilities that contain data GitLab needs to display in the vulnerability records, such as the identifier, severity, category, description, and location. I added a few placeholder sections for required fields that I did not need to display in my record. Finally, I saved the contents I parsed out to a new JSON file called gl-dependency-scanning-report.json, which is the required name for the file to be read by GitLab and have its contents displayed in the widget.
import json
from types import SimpleNamespace

with open("snyk_data_file.json") as snyk_data_file:
    snyk_data = json.load(snyk_data_file, object_hook=lambda d: SimpleNamespace(**d))

gitlab_vulns = []
dependency_files = []
for i in snyk_data:
    dependency_files.append({"path": i.path, "package_manager": i.packageManager, "dependencies": []})
    for v in i.vulnerabilities:
        gitlab_identifiers = []
        for vuln_type, vuln_names in v.identifiers.__dict__.items():
            if vuln_names:
                for vuln_name in vuln_names:
                    gitlab_identifiers.append({"type": vuln_type, "name": vuln_name, "value": vuln_name.partition("-")[2]})
                gitlab_vulns.append({"id": v.id, "category": "dependency_scanning", "severity": v.severity.capitalize(), "identifiers": gitlab_identifiers, "description": v.description, "location": {"file": i.displayTargetFile, "dependency": {"package": {"name": "PLACEHOLDER"}, "version": "PLACEHOLDER"}}})

# Dummy data for scan and dependency files
full_json = {"version": "15.0.6", "dependency_files": dependency_files, "scan": {"analyzer": {"id": "snyk", "name": "Snyk", "vendor": {"name": "Snyk"}, "version": "1.0.2"}, "scanner": {"id": "my-snyk-scanner", "name": "My Snyk Scanner", "version": "1.0.2", "vendor": {"name": "Snyk"}}, "end_time": "2022-01-28T03:26:02", "start_time": "2020-01-28T03:26:02", "status": "success", "type": "dependency_scanning"}, "vulnerabilities": gitlab_vulns}

with open("gl-dependency-scanning-report.json", "w") as gitlab_file:
    json.dump(full_json, gitlab_file, default=vars)
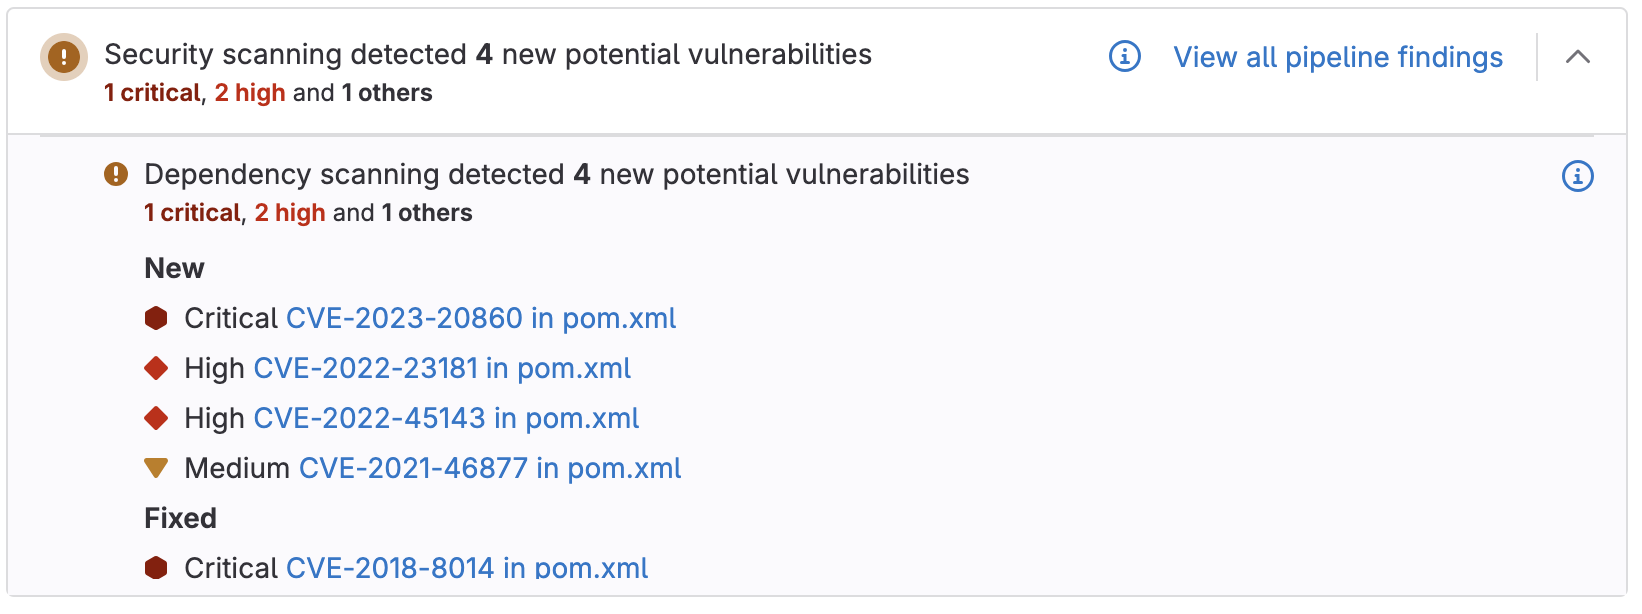
Now, the vulnerability findings are visible in the merge request widget.
What are SARIF and the SARIF converter?
SARIF is a file format for the output of static analysis tools. It is incredibly useful when leveraging different security scanners, as all of their output is formatted the same way. This allows for a generic, repeatable, and scalable approach to application security.
GitLab has a SARIF converter, which takes SARIF files and converts them into ingestible reports. It supports many scanners, including Snyk. Our converter works for both SAST and code quality findings. We are going to focus on SAST for this blog.
Use a SARIF converter to get SAST results
To leverage the SARIF results, first I trigger a Snyk scan as we did in the previous example, but I save the output to a SARIF file. After this, I use the converter to create a new JSON file that I save as a report.
snyk:
  image: node:latest
  stage: test
  services:
  - openjdk:11-jre-slim-buster
  before_script:
    - apt-get update
    - apt-get install default-jdk -y
    - wget -O sarif-converter https://gitlab.com/ignis-build/sarif-converter/-/releases/permalink/latest/downloads/bin/sarif-converter-linux
    - chmod +x sarif-converter
  script:
     Install npm, snyk, and maven
    - npm install -g npm@latest
    - npm install -g snyk
    - npm install maven
    # Run snyk auth, snyk monitor, snyk test to break build and out report
    - snyk auth $SNYK_TOKEN
    - chmod +x mvnw
    - snyk test --all-projects --sarif-file-output=snyk.sarif  || true
    - ./sarif-converter --type sast snyk_sam.sarif snyk.json

  artifacts:
    reports:
      sast: snyk.json
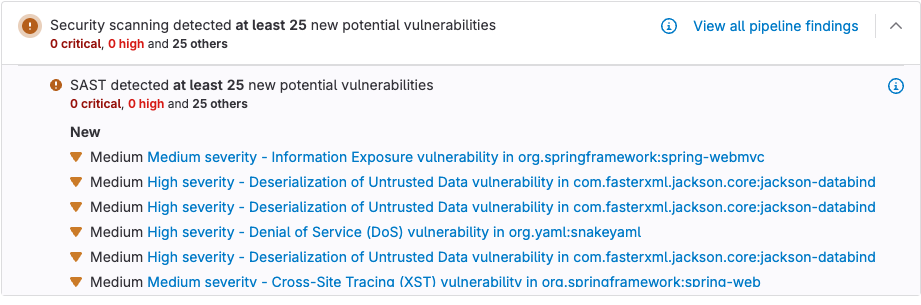
After saving the JSON as an artifact, the results are visible in the merge request widget.
Get started
In this blog post, you learned how to use both custom scripting and the SARIF converter to view external scanner vulnerabilities in the GitLab merge request widget. These operations can be completed from the pipeline as shown, but also from compliance pipelines and pipeline execution policies, which allow for the enforcement of external scanners. With GitLab Ultimate. you have access to a full DevSecOps platform that allows you to use our scanners or bring your own, but build a shift-left workflow that empowers developers to remediate vulnerabilities before they hit production.
Trial GitLab Ultimate today to begin merging external scanners.